Automatically set unique permissions in SharePoint with Microsoft Flow
We have a customer who is using SharePoint Online and they recently asked us to find a solution for the following situation in the Documents library.
There are a couple of root-level folders which are shared with specific user groups using a special permission level which doesn’t allow the users to delete those parent folders. However, the customer needs to allow the users to create new sub-folders and also delete them. The problem is that the sub-folders automatically inherit the permission settings of their parent folder which doesn’t allow the delete operation. So, they need to automatically break the inheritance and set appropriate permissions for the new sub-folders.
We found that Microsoft Flow is a great tool which helped us to resolve this problem by automating the process of breaking the default permissions inheritance and setting the desired permissions in SharePoint.
In this particular request we need to programmatically break inheritance of permissions for a given file/folder. Also, we need to assign unique permissions for that file/folder. These operations could be performed programmatically by calling the SharePoint REST API. This is a secured API and all API calls should be authenticated and authorized. This authentication is based on access tokens.
We ran into some peculiarities while implementing the solution and that is why we decided to share our experience here.
Provide external apps with access to SharePoint REST API
The SharePoint REST API is available to any external apps and/or processes which need to collaborate with the platform. Each app that will be granted with access to the SharePoint API needs to be registered and authorized first.
The first step is to register the app. This could be done by accessing the following URL in your SharePoint Online environment:
https://[YOUR_SITE].sharepoint.com/_layouts/15/appregnew.aspx
You will see the following form:
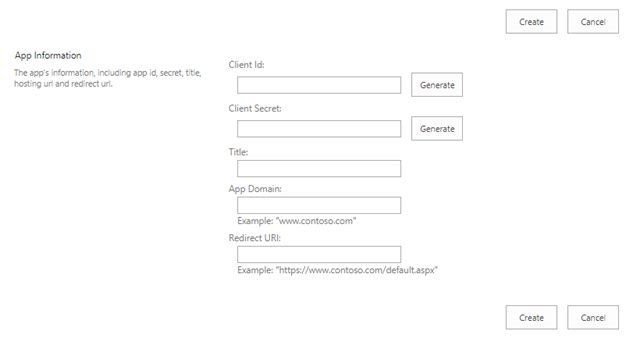
Click the “Generate” buttons for both Client Id and Client Secret. Keep these values for later usage.
Enter Title of the new add-in. You can use the following values for the last two fields:
App Domain = localhost
Redirect URI = https://localhost
Finally, click the “Create” button and you will see a confirmation message if the app identifier has been successfully created.
The next step is to grant permissions to the Add-in. Navigate to the following URL to grant permissions:
https://[YOUR_SITE].sharepoint.com/_layouts/15/appinv.aspx
You will see the following form:
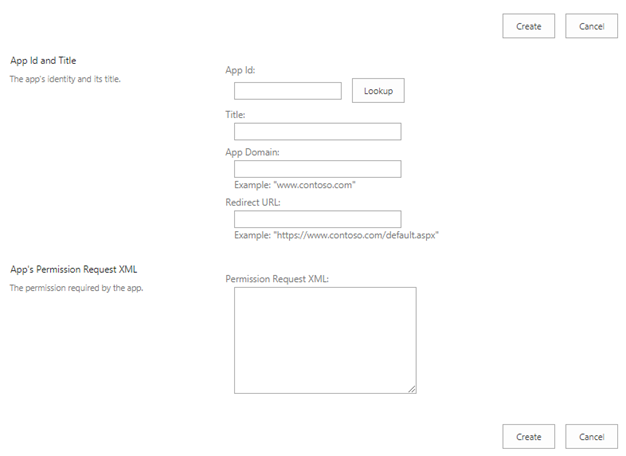
Enter the Client Id from the previous step into the App Id field and click the Lookup button. As a result, the Title, App Domain and Redirect URL fields will be automatically populated with the values which were entered in the previous step.
Enter the following XML text into the “App’s Permissions Request XML” field:
<AppPermissionRequests AllowAppOnlyPolicy="true">
    <AppPermissionRequest Scope="http://sharepoint/content/sitecollection/web" Right="FullControl" />
</AppPermissionRequests>
This will grant “Full Control” permissions to the external app/process. Finally, click the “Create” button. You will see the following confirmation prompt:
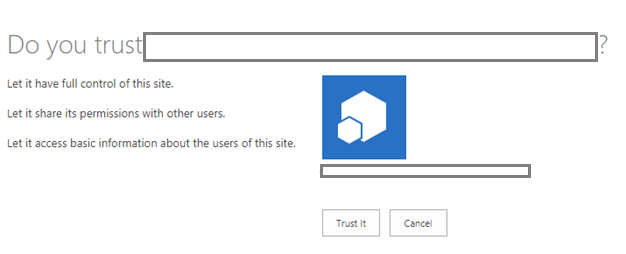
Click the “Trust It” button.
The next step is to retrieve the Tenant ID. In order to do that, the following HTTP request needs to be performed:
Method: GET
URL: https://[YOUR_SITE].sharepoint.com/_vti_bin/client.svc/
Headers:
Authorization: Bearer
Here is a screenshot from Postman:
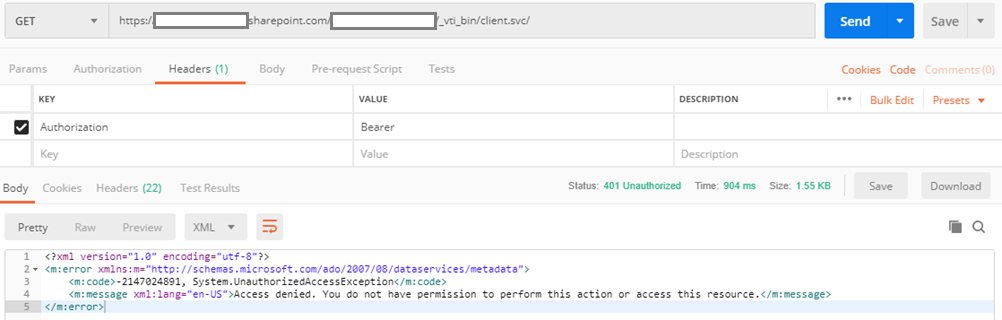
Even though the body says “Access denied.”, we can check the response headers where the Tenant ID is returned as part of the “WWW-Authenticate” line. See below:
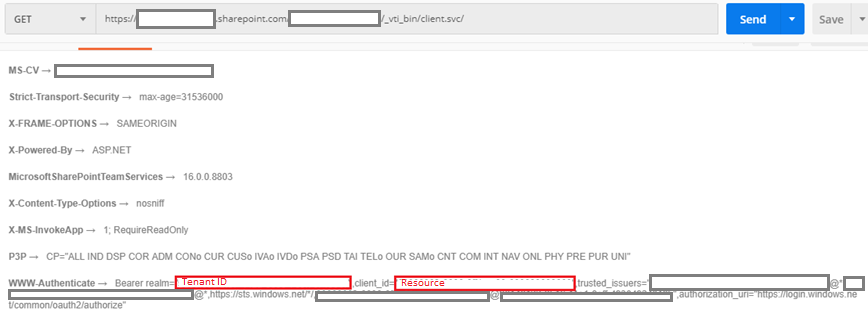
Keep these two highlighted values (they will be used later): Tenant ID and Resource.
In order to generate an Access Token, we need to perform an HTTP call to a specific URL. For demonstrative and testing purposes we used Postman to make that HTTP call. However, access tokens expire and we need to generate such a token each time we need to access the SharePoint REST API. That is why calling that HTTP endpoint and generating a new access token will be part of the Microsoft Flow solution, which is explained in the second part of the current article.
We need to make an HTTP call to this URL https://accounts.accesscontrol.windows.net/[TENANT_ID]/tokens/OAuth/2
The following HTTP header needs to be passed:
Content-Type: application/x-www-form-urlencoded
The remaining parameters need to be sent as part of the body of the POST request. Here is the list of parameters and their syntax:
grant_type -> “client_credentials”
client_id -> ClientID@TenantID
client_secret -> ClientSecret
resource -> resource/SiteDomain@TenantID
The HTTP method needs to be POST. Here is a screenshot from Postman:
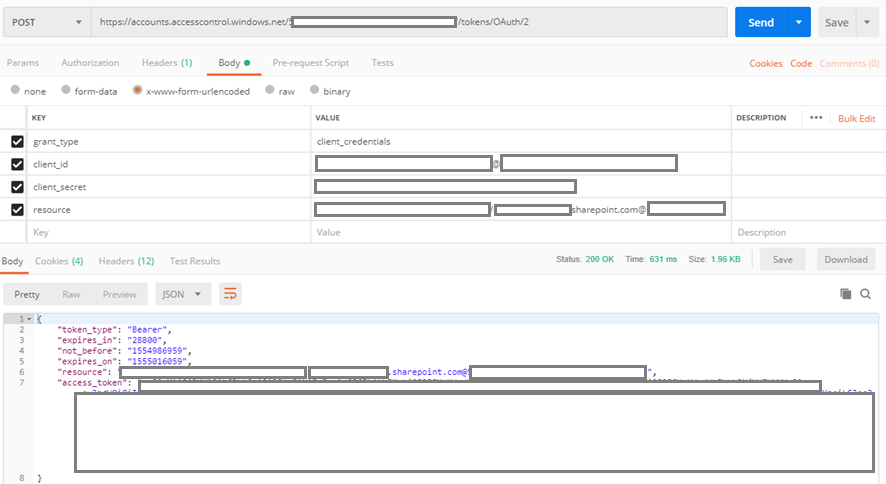
If all the parameters have been sent correctly, then the response of the HTTP call will contain the access token. That access token could be used later to make HTTP calls against the SharePoint REST API.
Setup automated workflow in Microsoft Flow
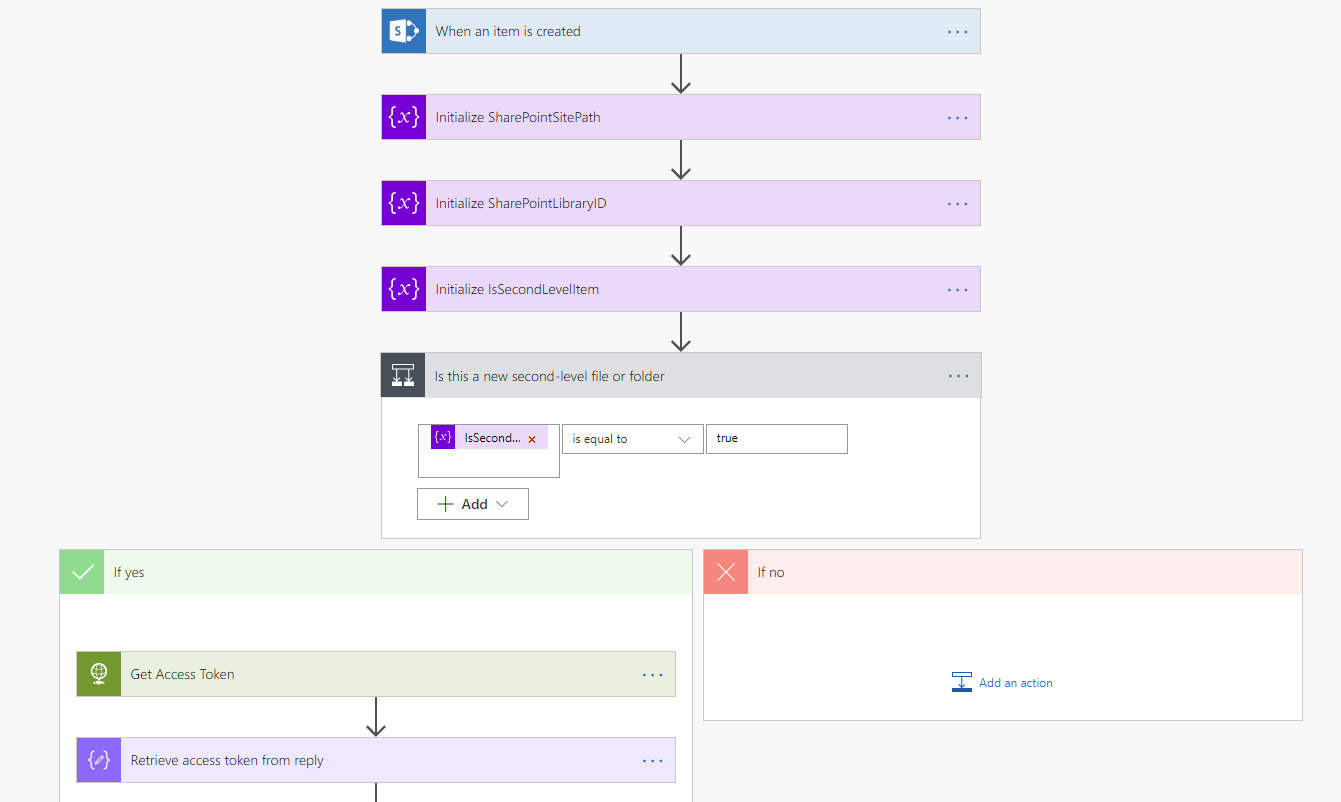
Navigate to https://flow.microsoft.com and sign-in. For the purposes of our task, we created a workflow which performs the following:
a) The workflow is triggered when an item is created in the target library in SharePoint. In other words, the workflow is triggered when a file or folder is created in the target Documents library.
b) The workflow performs the following steps:
a. If the new file/folder is not second-level in the hierarchy, then noting happens. Otherwise, when the new folder is second-level, then the next steps are executed.
b. A new valid access token is obtained. It is used in all next SharePoint REST API calls.
c. SharePoint REST API call to get the ID of the “Contribute” permission level.
d. SharePoint REST API call to break the permissions inheritance of the new item.
e. SharePoint REST API call to get a list of all roles assigned to the new item.
f. SharePoint REST API call to remove each of the roles pulled in the previous step.
g. SharePoint REST API call to re-assign each of the removed roles. Each role is granted with the “Contribute” permissions level.
Here is a screenshot from Microsoft Flow:
Following are details about all steps in the workflow:
- Trigger – When an item is created in the target library in SharePoint:

This type of trigger will automatically start the workflow when a new item (e.g. file or folder) is created in the target list library in SharePoint. To configure this step there should be selected two things:
Site Address – The web site where the target list resides. The UI allows to choose from a list of existing sites in the SharePoint environment.
List Name – This is the target library (e.g. Documents). We noticed that the UI shows some of the existing libraries in SharePoint, but not all of the lists are shown. For example, the Documents library is not shown. We are not sure why it works in this way, but we found a workaround in this article. The solution is to navigate to the “Library Settings” page of the target library and get the ID of the library from the URL:
- Initialize SharePointSitePath
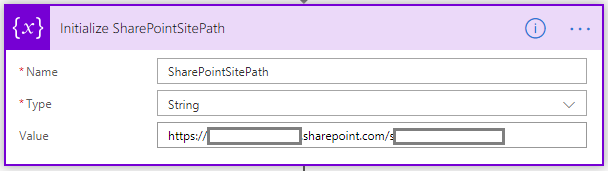
At this step we initialize a variable called “SharePointSitePath” which we use in the next steps where we need to use the URL path of the target site. Instead of typing the URL in every one of the next steps, we put the value in this variable to avoid repeating it and to make the process of a possible switch of the target website an easier task. - Initialize SharePointLibraryID
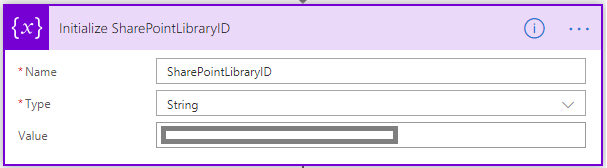
Similarly to the previous step, we put the ID of the target list in a variable so that we can re-use it later in each REST API call. - Initialize IsSecondLevelItem
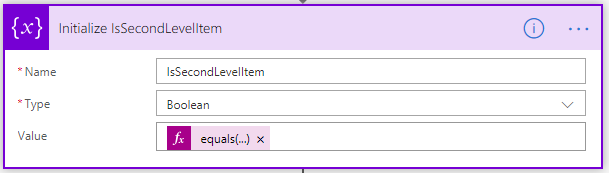
We keep the value of the following expression in a variable:
equals(length(split(triggerBody()?['{Path}'], ‘/’)), 3)
By counting the number of “/” characters in the path of the new item, we determine if the new item is second-level in the hierarchy. In that way, we can execute the next steps only if the new item is a second-level folder or file to meet the requirements. - Is this a new second-level file or folder
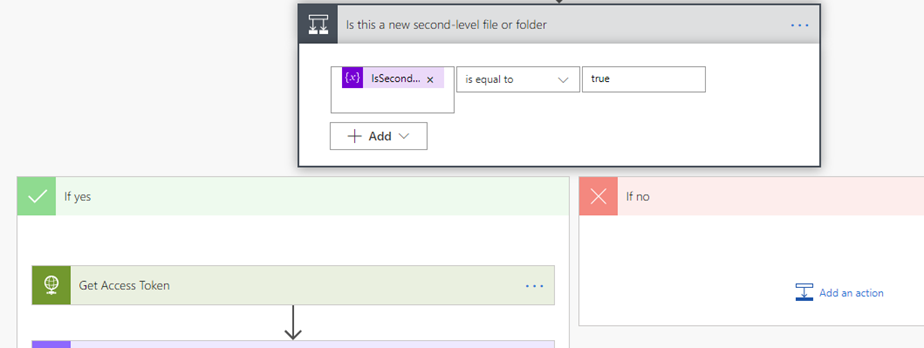
This step controls the flow of the workflow like the IF-THEN-ELSE statements normally control the flow of a computer program. It checks the value of the IsSecondLevelItem variable and it executes the next steps only if the new item is a second-level file or folder. - Get Access Token

This step performs an HTTP request to obtain a new access token which will be used to access the REST API. You can find more details about obtaining a new access token at the beginning of this document. The called URL is https://accounts.accesscontrol.windows.net/[TENANT_ID]/tokens/OAuth/2 and all the remaining parameters like Client ID and Client Secret are passed as part of the body of the POST request. - Retrieve access token from reply

This operation is of type “Parse JSON” and it parses the body of the response of the previous request for obtaining an access token. The parsed result is used in the next HTTP calls to the REST API which need authorization by passing a valid access token. - Get target permission level

This request calls the “_api/web/roledefinitions/getbyname(‘Contribute’)” method of the SharePoint REST API. It returns details of a given permissions level. In this case we get the “Contribute” permission level. We need the ID of that permission level so that we can use it later when we need to assign it to each role associated with the new file or folder. - Parse the target permission level
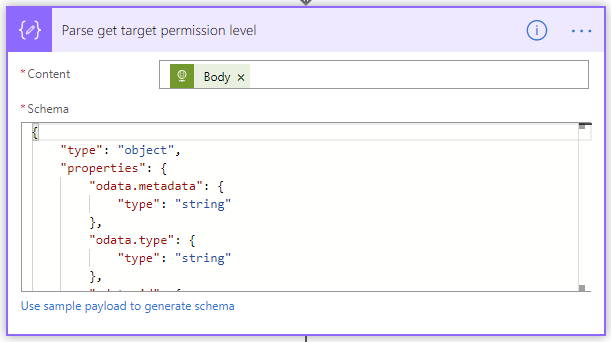
This is a “Parse JSON” operation and it just parses the JSON result of the previous HTTP call. - Break Inheritance

This is an HTTP call to the breakroleinheritance() method of the REST API. The URL for this method follows this pattern: /_api/web/lists/getById(‘XXX’)}’)/Items(YYY)/breakroleinheritance(true)The XXX part is the ID of the target list library and the YYY part is the ID of the newly created file or folder. They are populated dynamically by the previous steps in the flow.The “true” value passed to the breakroleinheritance() method indicates to break the inheritance but keep the list of inherited user roles.
- Get all role assignments
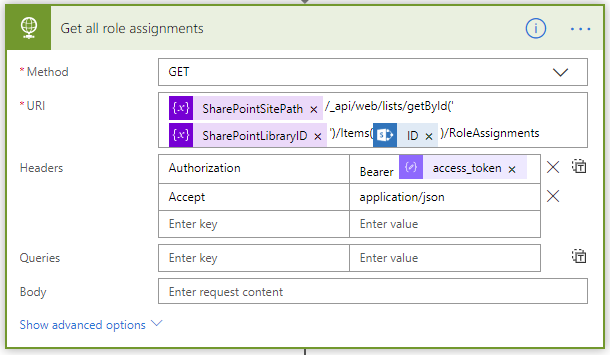
This is an HTTP call to the RoleAssignments method of the REST API. The URL for this method follows this pattern: /_api/web/lists/getById(‘XXX’)}’)/Items(YYY)/RoleAssignments/The XXX part is the ID of the target list library and the YYY part is the ID of the newly created file or folder. They are populated dynamically by the previous steps in the flow.This API method returns the list of all user roles associated with the new folder. The next steps will iterate trough these roles so that the workflow will do two things with each role – 1) the existing role assignment will be removed and 2) the role will be re-assigned again granting the “Contribute” permissions level.
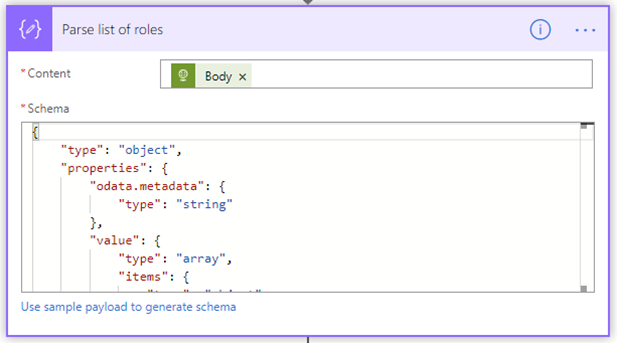
- Parse list of roles
This is a “Parse JSON” operation and it just parses the JSON result of the previous HTTP call. The list of roles is returned as an array. - Apply to each role
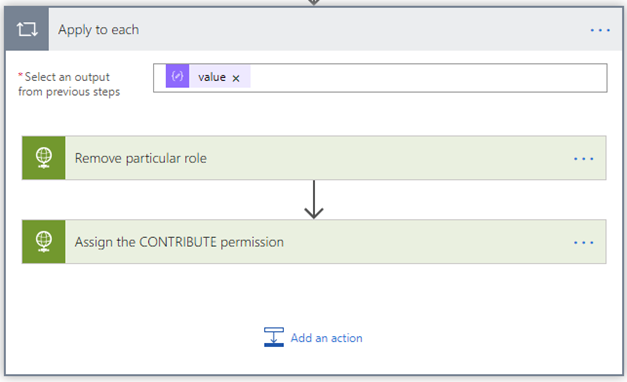
The JSON result of the previous step returns an array of roles. This step is an iterator which goes through all the roles from the array and it performs the next two steps for each role. - Remove particular role
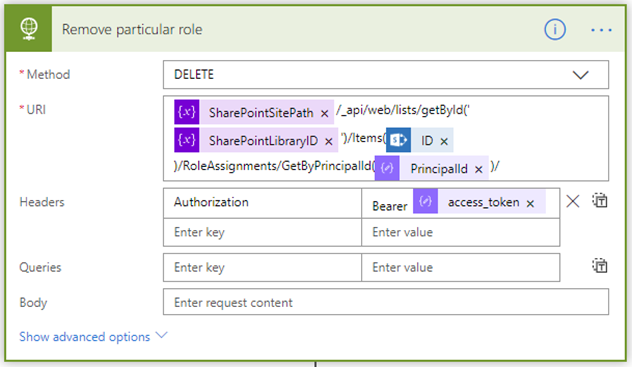
This is an HTTP call to the GetByPrincipalId() method of the REST API. The URL for this method follows this pattern: /_api/web/lists/getById(‘XXX’)}’)/Items(YYY)/RoleAssignments/GetByPrincipalId(ZZZ)/The XXX part is the ID of the target list library and the YYY part is the ID of the newly created file or folder. The ZZZ part is the ID of the principal/role. They are populated dynamically by the previous steps in the flow.
It is used the DELETE HTTP method which is an indication for the REST API that the particular user role assignment should be removed.
- Assign the Contribute permissions level
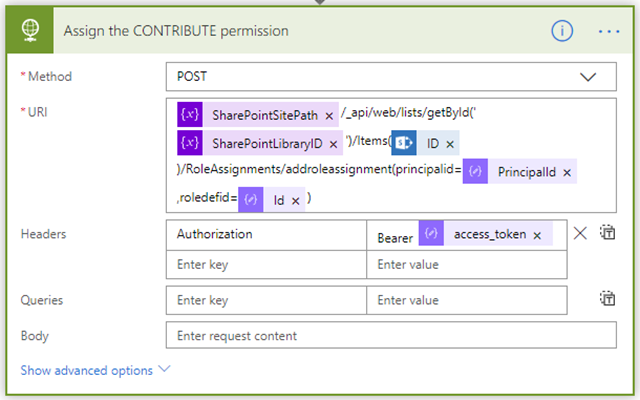
This is an HTTP call to the addroleassignment() method of the REST API. The URL for this method follows this pattern: /_api/web/lists/getById(‘XXX’)}’)/Items(YYY)/RoleAssignments/addroleassignment (ZZZ, RRR)/The XXX part is the ID of the target list library and the YYY part is the ID of the newly created file or folder. The ZZZ part is the ID of the principal/role and the RRR part is the ID of the target permission level (e.g. “Contribute”). They are populated dynamically by the previous steps in the flow.
It is used the POST HTTP method which is an indication for the REST API that the particular role should be granted with the “Contribute” permission level on the newly created file or folder.
I hope that information was helpful and you enjoyed reading it!
 0
0 0
0 0
0 0
0 0
0